About Me (4) Books (1) Happenings (2) Recipes (38) School (1)

Wednesday, January 26, 2011

Tater-Tot Casserole

The quintessential comfort food...Tater-Tot Casserole!


Ingredients:

1 lb. lean ground beef
1/2 medium onion, chopped
1 can condensed cream of celery soup
1 16 oz. package frozen tater tots
1 cup shredded cheddar cheese
Salt and Pepper to taste


Preheat oven to 375 degrees.
Brown ground beef and season with salt and pepper.


Add the onion and cook until tender.


Mix in cream of celery soup and spread in casserole dish.


Top mixture with tater tots.
Bake for 30-40 minutes, until tater tots are golden brown and mixture is bubbly.
Remove from oven, top with cheese, and return to oven until cheese is melted.

I have to ask, are you the type to organize the tots into concentric circles, perfect rows, or do you just haphazardly pile them on?

Friday, January 21, 2011

Honeybun Cake

Honeybun cake is an easy semi-homemade cake that was delicious and you can do all the mixing by hand! It is a perfect dessert or breakfast to share with others! I found this recipe at Tasty Kitchen and had to try it! Instead of making in a 9x13 dish, I split this recipe into two 9x9 dishes. It worked out beautifully and allowed me to send the neighbors a tasty treat, which they claimed to have enjoyed as much as we did!

Honeybun Cake


Ingredients:
1 box yellow cake mix
4 eggs
1 cup sour cream
¾ cups vegetable oil
1 cup light brown sugar
2 teaspoons cinnamon
2 cups powdered sugar
6 Tbsp. milk
1 teaspoon vanilla extract


Preheat the oven to 325 degrees.
By hand, blend the cake mix, eggs, sour cream, and oil until well-incorporated. The mixture will be pale yellow; it’s okay if it has some lumps! Set aside.


In a separate bowl, mix together the brown sugar and cinnamon until well-blended; set aside.


Pour half of the cake batter into a greased 13×9 pan, spreading the batter out into a thin layer (or two 9x9 or two 8x8 if splitting into two dishes).


 Add half of the swirl mixture to the top, covering the entire layer of batter.


Pour the rest of the batter on top, and spread the batter until the cake is even. 


Sprinkle the cake with the rest of the swirl mixture. With a knife, swirl the batter until it looks like above.
Place the cake into the oven and bake for 45-50 minutes, or until an inserted toothpick comes out clean.


For the glaze:
In a bowl, mix the powdered sugar, milk, and vanilla until glaze is of desired consistency. When the cake comes out of the oven, immediately pour glaze onto the hot cake. Serve at room temperature.


Monday, January 17, 2011

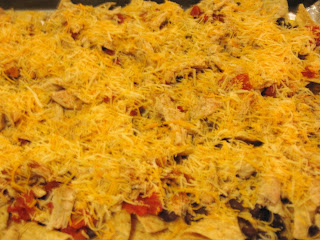
Black Bean and Chicken Nachos

As I come to write this next post, I've realized that blogging can be hard at times! :)

Here is a list of challenges I've realized throughout this learning process called blogging:
1. Don't make up a recipe and fail to post for a few weeks. You'll forget your own recipe and that makes it quite hard to share with others.
2. Taking photos of food is no picnic. I'll elaborate:
3. The best lighting is pure daylight, which isn't readily available after work when it is pitch black before making dinner even comes to mind.
4. Who makes dinner when its daylight out anyway? Even if I was home during the day, my ham and cheese sandwich that I would make for lunch definitely isn't blog-worthy, it's the supper meals where I break out the big guns.
5. Using a flash when taking pictures is a no no, and therefore, I'm often uploading five or so takes of each snapshot trying to get one that isn't blurry. I'm apparently not as still as the lens would like me to be...sorry lens, I'm really working on it.
6. In an effort to fake the natural lighting, I'm carting around florescent lamps, especially in my new wonderful kitchen, with its not so wonderful dim lighting.
7. Taking those coveted action shots is a pill. Because I'm right handed, I take pictures right handed and I also cook right handed. Try to do both at one time without two right hands, well, you get the picture. I'm waiting for the day when I have to break it to my husband that my camera landed in spaghetti sauce.
8. I'm a procrastinator on blogging, because, well, sometimes, I'm just not that interesting. I find it hard to think of fabulous, red carpet introductions. Maybe I'll just cut back on that a tad, since there are many recipes in my files ready to be blogged about...you won't mind a lack of commentary once in a while, huh?
9. Last but not least, I've learned how much editing goes into great photography. My intentions are there, but I'm learning as I go.
Better and better I'll become!

So take all that into consideration with this tasty next recipe. A little blurry, a little dark...but oh so comfort food good.

Black Bean and Chicken Nachos
By me

Ingredients:
Tortilla Chips
Shredded Cheddar Cheese (2 cup bag)
Black Beans
Rotel (spicy, mild, however you roll)
Chicken, cooked and shredded: see recipe below.
Taco Seasoning
Sour Cream

This is a great recipe, when vegetables aren't at their peak, in other words, when it's winter.


Preheat oven to 350 degrees. Line baking sheet with foil so you don't have to do dishes.
Spread baking sheet with tortilla chips until well covered.


Sprinkle with 3/4 cup shredded cheese so the rest of the ingredients stick to the chips.


Drain and rinse black beans and spread over chips.
Drain Rotel and spread over beans.


Top with shredded chicken.


Sprinkle 2-4 Tablespoons taco seasoning over chicken.
Top with remaining 1 1/4 cup cheese.


Bake at 350 until cheese is melted and ingredients are warmed through.


Serve with sour cream.

Slow cooker chicken:
I love making shredded chicken for any recipe in the slow cooker. It makes for wonderfully moist chicken and there's no need to thaw.
1. Place appropriate amount of chicken breast pieces into slow cooker. (2 for the nachos)
2. Season with salt and pepper.
3. Fill slow cooker with chicken broth until it reaches at least halfway up the chicken pieces.
4. Cook on low 6-7 hours.
5. Shred with a fork.
6. Continue cooking shredded chicken in juice for 45-60 more minutes.

Sunday, January 9, 2011

Homemade Macaroni and Cheese

I am a sucker for macaroni and cheese. I love the Kraft boxed, Velveeta boxed, easy mac, fried mac and cheese, you name it. I grew up eating my families traditional macaroni and cheese, you can find the recipe here (blogged by my cousin, Jandee) and I continue to try new recipes.

For the past two years I have leaned on a mac and cheese recipe that includes red onions and breadcrumbs. It is the quintessential macaroni and cheese recipe for me. I found it on the back of a Creamette elbow noodle box. I've found that if anyone is going to know the perfect recipe for a product, it'll be the people who produce and package it. I trust most any recipe on the back of a box for that reason. They must be confident enough in their recipe to put it so readily available to consumers! And they didn't disappoint!

So do any of you have macaroni and cheese recipes to share? I'd love to try them! I think my next one is going to be a buffalo chicken mac and cheese...spice things up a bit!

Classic Macaroni and Cheese
Slightly adapted from Creamette


Ingredients:

1/2 package (8 oz.) elbow macaroni, then dump in a little more for good measure! :)
3 Tbsp. margarine or butter
3 Tbsp. flour
2 1/2 cups milk (I use skim and it's just fine.)
1/2 tsp. salt
1/8 tsp. pepper
3/4 cup chopped red onion
2 cups  (8 oz.) shredded cheddar cheese (mild or medium)
1/2 cup plain breadcrumbs

While preparing cheese sauce, cook pasta according to directions or until al dente (slightly undercooked) and preheat oven to 350 degrees.


To make the roux: In a pan, melt margarine. Stir in flour, and cook for a minute or so.


Gradually stir in milk. Cook, stirring constantly over medium heat, until sauce thickens.
Stir in salt and pepper.


Add onion and cheese; stir until cheese melts.


Stir cooked pasta into cheese mixture. Spoon into greased 9x13 baking dish.


Top with breadcrumbs.
Bake 30 minutes.


Then sit down, kick up your feet, and eat the whole thing.

Sunday, January 2, 2011

Our Christmas Gift


I have missed posting oh-so-much these past few weeks! The goal that I set myself was to post twice a week or so and I think I have some catching up to do! We have been rather busy lately! Along with our usual travels and family visiting (which we enjoyed immensely), we were able to close on our dream home two days before Christmas! This home was a long time in the waiting. Much to our disappointment, last year, this home slipped through our fingers. However, losing the home then was the best thing that could have happened to us. Months passed after that, and we tried to forget about what could have been! Well, only a few weeks ago this house kind of fell into our lap again and we jumped at our second chance! Not only have we secured our dream home, but we did so at an amazingly, need-to-pinch-myself-to-believe-it deal! We are so excited to start this adventure together!

Our new home is not necessarily "new" to anyone but ourselves. This home was built in 1836, which makes it 175 years old! We are in the process of researching more about the original owners and history, and we are so excited to start renovating! Here's what we know so far: the lower level originally served as a doctor's office, the original owners had slaves, the owner passed away and we were left with his original headstone as it cracked on the way to the grave site and had to be replaced. This headstone is now resting on one of our four fireplaces...creepy much? We know that it used to sit on sprawling farmland, has an original staircase along with many other original features, and suffered a fire on the top floor. The top floor needed to be rebuilt in the 1980s. It is situated in the middle of thousands of modern homes and is currently part of a developing subdivision. And when you walk in the front door you are immediately sent from fabulous 2011 to the intriguing 1800s! Needless to say, it stands out! We will keep everyone posted on the project and will add pictures of the interior soon!

This new year brings a lot of hope and optimism for many people. I truly hope you and yours experience renewed love for each other and yourself. I wish you the best of luck on your resolutions! I also want to express my thanks for taking time to read about little-ol-me and supporting me and my new found hobby (I now have 18 followers!) ...many more recipes to come!